If the application includes an operation involving the upload of a file from the users computer to the server, it may be desirable to provide different files during a simulation. Configuration to simulate the upload of different data files during a load test is broken down into three steps:
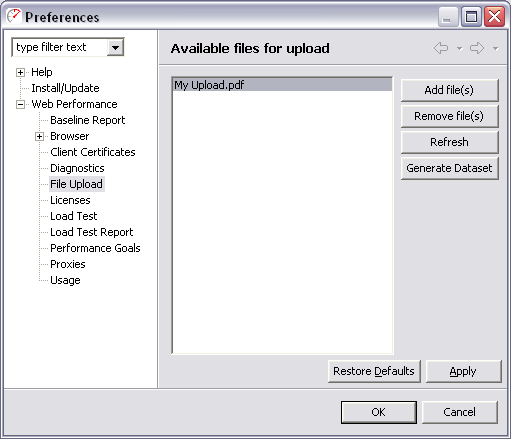
A predefined set of files must be imported into Load Tester through the File Uploads preferences page. This page may be accessed from the menu: Window » Preferences » Web Performance » File Uploads .
Once on the File Upload page, you may select the "Add file(s)" button to select files for Load Tester to keep available for use during a load test. Each file will be copied into a private location from which they may be synchronized with any remote load engines in use prior to a load test. If a file is changed after adding it, the "Add file(s)" button may be used to replace the copy used for load testing with the updated copy.
The simplest way to create a dataset is from the same File Uploads preferences page described above. By selecting the "Generate Dataset" button, Load Tester will offer to create a dataset of all the files currently available using the repository and names specified.
Alternatively, if the intended load profile consists of different test cases where some files may be used in one test case and not another, then it may be necessary to customize a dataset to specify the subset of files that should be used. Please see Create a new dataset for more information.
Once files have been successfully imported and a dataset prepared, we will be ready to proceed to the Fields View to locate a file upload to be updated.

Editing a file upload field is similar to editing other fields. The first step will be to configure the value, which contains the file contents. To use the files configured above for the content of the file upload, choose a File upload datasource. You will then have the opportunity to choose a source for the name of the file to use as the content. By default Load Tester will select a Dataset source, which is the most common method. Then choose the dataset and field that contains the filenames:
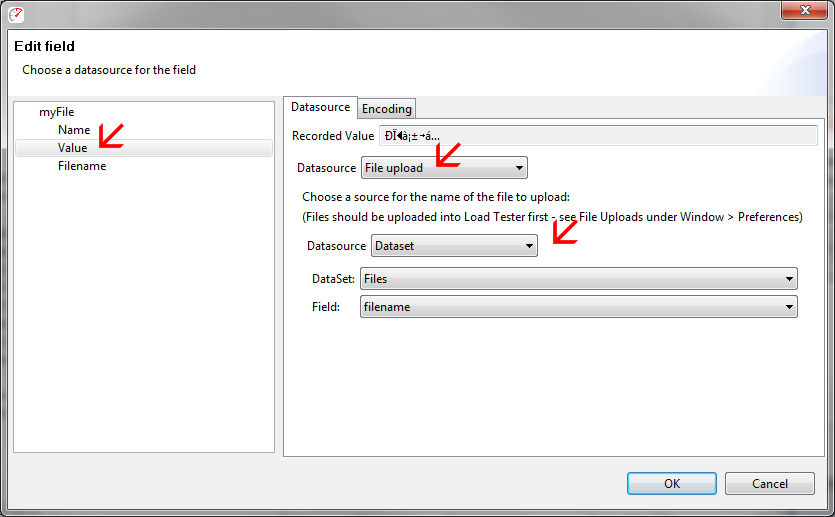
When editing the modifier of a file upload field, the Field Editor dialog will show a Filename part, in addition to the name and value parts. The Filename part of the field can be used to configured to change the name of the file sent to the server, if required. This may be the same dataset field as specified above if just the name of the file (excluding the path name) is sufficient, or an alternate dataset field containing a complete file name may be used. In many cases, the server will completely ignore the filename sent - in these cases the Filename part can be left as a recorded datasource.
